

How To Build A Forge In Minecraft
This commodity is about creating mods for Coffee Edition. For the Bedrock Edition add-ons, see Addition.
![]()
![]()
![]()
This article is a piece of work in progress.
Delight help in the expansion or creation of this article by expanding or improving it. The talk page may contain suggestions.
Overview [ ]
Mods (brusk for 'modifications') can alter or add items, blocks, entities, and much more. Presumably, yous already have an idea for a mod yous want to create. If you merely want to add custom advancements, functions, loot tables, structures, recipes or tags to your game, expect into how to brand a Data pack, which does non require programming. Or look into how to brand a resource pack if you merely want to customize textures (colors and designs), models, music, sounds, languages, splashes, fonts, or the end poem. Or perhaps yous want to 'fork' a favorite mod to update for newer versions of Minecraft. In whatever instance, this guide volition eventually embrace only the most basic elements of creating an item and creating an entity (a moving affair like a villager, sheep, zombie, etc.), and distributing the resulting mod package.
Minecraft mods consist of jar files (case: yournewmod.jar) which contain class files, JSON files, and prototype files, to name a few of the nigh mutual.
- Class files are specific to the Java programming language. A few Java tutorials to try are w3schools (web and mobile), SoloLearn (web and mobile), and kodevelopment(web). You will demand an IDE (Integrated Development Environment) such equally IntelliJ or Eclipse to read or create class files. This tutorial will focus on IntelliJ Thought Community Edition 2019.
- JSON files are a means of detailing the characteristics of objects used by Java form files. JSON is much simpler than Java. Y'all will demand a text editor such equally Notepad++, Vim, or Emacs to read or create JSON files. You probably already have a basic text editor on your computer, but at that place are many advantages to using other ones instead.
- Image files you lot may exist familiar with include .bmp and .jpg formats, but Minecraft requires .png format (case: yournewlogo.png) in multiples of 16 pixels square (case: 16x16, 32x32, 64x64). You will need an image editor such as Pigment.Net or GIMP to edit or create .png files. You probably already take MS Pigment on your calculator, just GIMP has and then much more functionality, and Paint.NET is quite user-friendly. There are also several websites with tools for creating pixel fine art.
If y'all take been playing Minecraft Java Edition, you probably already accept JRE (Java Runtime Environment). To develop a mod, you will need to find JDK (Coffee Evolution Kit), which includes the JRE and an emulator. Create a free account at oracle.com and download JDK Standard Edition version 8. Then follow the instructions for installing it, and make note of the location it installs to. Pay particular attention to the department on Updating the PATH Environment Variable.
With a Java Development Kit installed, and the IntelliJ Integrated Evolution Environment to manipulate Java with, you now have the tools to develop custom software that tin be used in a diversity of applications. While working on a modern, proceed working through Java tutorials. The lessons will enable y'all to put your ideas into action, while the ideas will make the lessons more interesting and memorable.
Ane more tool you should ready up before starting a modernistic is the Forge MDK (Modernistic Development Kit). Forge is a drove of useful resources and modern loader, designed specifically to simplify compatibility betwixt Minecraft Java Edition and multiple community-created mods. This tutorial will focus on the MDK for version i.12.ii of Minecraft Java Edition, although Forge for 1.fourteen.four has been around for some time. An alternative to Forge is Fabric, but Java is still used to code mods either mode.
Things not to exercise [ ]
There are some things that you lot should exist careful to not do when creating a mod. Go on this list in mind:
- Don't practise annihilation that violates Mojang Studios' terms of use for Minecraft.
- Don't release Minecraft versions or modifications that allow you to play without having bought Minecraft from Mojang Studios.
- Don't release the de-compiled source code of Minecraft in any way.
- Don't modify existing mods without permission from that mod's author(s). Check their License, usually available in the author's GitHub repository. If you tin can't observe the license, and then you exercise not have permission to share a modified version with anybody. Y'all may tinker with the files for personal apply just.
First steps with Forge [ ]
This wiki article aims to provide a foolproof walk-through of a few key elements of Forge's tutorial: https://mcforge.readthedocs.io. Bookmark their page, as information technology addresses many issues this article will non. Moreover, there's more than one valid way to achieve the desired result; this wiki article volition focus on the simplest, which is probably not the near efficient or elegant. If you follow precisely the steps outlined here, you should soon accept a functional mod, which you can then tinker with to your heart's content. If you use Linux, Forge's tutorial will probably exist more useful for yous. If you utilise Windows, read on.
A note near placeholders [ ]
This tutorial will use "You" to correspond the User profile you are logged in with; if you copy-paste paths from this tutorial, be sure to replace "You" with your own Windows username. This tutorial will use "yournewmod" to represent sections you should replace with the mod proper noun you lot choose for your project.
i. Create a folder for your project [ ]
Navigate to C:/Users/You/Documents and create a new folder. The name of this folder may exist inverse easily later.
2. Obtain a "source distribution" [ ]
Visit https://files.minecraftforge.internet and brand sure the version selected is the version for which you desire to create a mod. In the large "Download Recommended" box, click on the modest MDK box. A dialog box volition appear, asking where you want to salvage the file, and what to proper name it. Choose any user-friendly location, but leave the name unchanged.
3. Copy key files to your project folder [ ]
Open up the forge-1.16.5-...-mdk binder (with or without unzipping it first) and copy-paste the following v files from this folder[ more data needed ] to the project binder you lot created in the first step:
- the
srcfolder - the
gradlefolder -
gradlew -
gradlew.bat -
build.gradle
3½. A note about mappings [ ]
There are two different sets of mappings available for method names - "MCP" community-based mappings, and "Official" mappings based in office on the official Obfuscation maps (though course names are different for technical reasons). The default in the MDK has recently been changed to 'official', but this tutorial will use the MCP mappings for now considering function parameter names are non available in the official mappings.
Modify the following line in build.gradle line 34
mappings aqueduct : ' official ' , version : ' 1.sixteen.five ' to
mappings aqueduct : ' snapshot ' , version : ' 20210309 - 1.16.5 ' On line 51 of ExampleMod.java, change options to gameSettings (or just comment or delete the line)
4. Import the gradle project [ ]
Open up/Run the IntelliJ Thought program. In the landing screen, click on Open. A dialog box will appear, request which file to import. Navigate to your project folder and select "build.Gradle," then click OK.
5. Designate the JDK [ ]
In the next window, click in the "Gradle JVM" field and navigate to the JDK files you installed before. If yous got version 8 update 282, select the folder named "jdk1.8.0_282." Click OK and look for the build to finish, Showing the results in the bottom field.
[TODO: I didn't get another window, demand to verify what happens on a fresh IDEA install]
[Note: Confirming that on IntelliJ Thought 2021.1.2 window doesn't appear, well-nigh probable that it detects JDK itself, so information technology will only appear if it failed to locate appropriate JDK]
half-dozen. Set up workspace [ ]
No Dependencies needed to be Installed. Motion to next step every bit new update in Forge command setupDecompWorkspace is not needed
7. Configure Run settings [ ]
Subsequently refreshing gradle, open the gradle panel and double-click the "genIntellijRuns" entry in the "fg_runs" folder. This will create new run configurations that permit your mod to be run. Next, open the "Edit configurations" window of Run settings and look approximately halfway down, for "Employ classpath of module." Click on its dropdown field, and select the option that ends with .master, then click Apply. If the settings you only finished editing were for the Minecraft Customer, click on Minecraft Server and echo the steps to set the classpath. [TODO: Is this necessary anymore? It was already set up]
Y'all can now select and run runClient in the run configuration driblet down bill of fare. This will start the Launcher with your mod included. When you get to the landing bill of fare, you tin can bank check whether your mod is present.
Creating a mod for Forge [ ]
Identifying your modernistic [ ]
![]()
This department is a piece of work in progress.
Delight help in the expansion or creation of this article by expanding or improving it. The talk page may contain suggestions.
The projection as delivered with the MDK is called "examplemod" with the package name "com.example.examplemod". You will need to rename this to your own names in the following places - rename the class files - build.gradle - META-INF/mods.toml
Package names should be based on a domain proper name in contrary order, or a proper noun that is non a valid domain name if y'all practise non own a domain proper noun.
[TODO clearer instructions, set up MODID variable]
Setting upwards Item Registration [ ]
![]()
This section is a work in progress.
Please assistance in the expansion or creation of this article by expanding or improving it. The talk page may incorporate suggestions.
Yous tin can create a class to put your definitions in. Here nosotros call information technology ModItems, though in theory you could just add it to the main class. Having at to the lowest degree one class file (or, ideally, a package) to put registrations in without any non registration related lawmaking provides better organization for when y'all expand your mod.
Firstly, create a DeferredRegister of blazon Item. This is effectively a list that is used to register items. Then, in order to register an item, create a RegistryObject as shown below.
packet com.example.examplemod ; import cyberspace.minecraft.item.Particular ; import internet.minecraft.particular.ItemGroup ; import net.minecraftforge.fml.RegistryObject ; import net.minecraftforge.registries.DeferredRegister ; import net.minecraftforge.registries.ForgeRegistries ; public course ModItems { public static final DeferredRegister < Item > ITEMS = DeferredRegister . create ( ForgeRegistries . ITEMS , ExampleMod . MOD_ID ); public static last RegistryObject < Item > ITEM_NAME = ITEMS . register ( "ITEM_NAME" , () -> new Item ( new Item . Properties (). tab ( CreativeModeTab . TAB_MISC ))); } If you desire to add more options add together . [dot] at the end of ,, CreativeModeTab.TAB_MISC) "
when its completed register item in your item class like this:
public static void register ( IEventBus eventBus ){ ITEMS . register ( eventBus ); } then in your main grade constructor add together the code to create an result bus and register:
IEventBus eventBus = FMLJavaModLoadingContext . get (). getModEventBus (); ModItems . register ( eventBus ); or yous can do with this code beneath.
In your main class, set information technology up to automatically be called at the appropriate time, in the public ExampleMod() constructor:
ModItems . ITEMS . register ( FMLJavaModLoadingContext . get (). getModEventBus ()); And now y'all need to translate this item. Within resource add a directory named assets and inside add lang like this
JSON and Texture Files [ ]
Linguistic communication File [ ]
resources\assets\examplemod\lang\en_us.json (<- en_us.json is the language)
inside en_us.json write:
{ "detail.examplemod.ITEM_NAME" : "TRANSLATED_NAME" , } the item.examplemod.ITEM_NAME needs to friction match the name you put inside ModItems course [where your items are].
Item Model File [ ]
resources\avails\examplemod\models\item\item_name.json
Within add the following.
{ "parent" : "item/generated" , "textures" : { "layer0" : "tutorialmod:item/item_name" } } particular/generated is the default with no special features for rendering.
Texture File [ ]
resources\assets\examplemod\textures\item\item_name.png
This is where you should add your texture image file.
Creating a Custom Cake [ ]
Setting upwardly Block Registration [ ]
Firstly, create a new DeferredRegister of type block which will be used to register any blocks. Make certain to import internet.minecraft.block rather than whatsoever of the other options.
public static final DeferredRegister < Block > BLOCKS = DeferredRegister . create ( ForgeRegistries . BLOCKS , ExampleMod . MOD_ID ); Next, you need to register the method with the IEventBus parameter. If you lot have a separate ModBlocks course then add the post-obit method to it, otherwise add information technology to your already existing annals method.
public static void register ( IEventBus eventBus ) { BLOCKS . register ( eventBus ); } To create blocks easily add together the following two helper methods to your grade. registerBlock registers the block while registerBlockItem registers the associated item.
private static < T extends Block > RegistryObject < T > registerBlock ( String proper name , Supplier < T > cake ) { RegistryObject < T > toReturn = BLOCKS . register ( proper noun , block ); registerBlockItem ( name , toReturn ); return toReturn ; } private static < T extends Block > void registerBlockItem ( Cord name , RegistryObject < T > block ) { ModItems . ITEMS . register ( name , () -> new BlockItem ( block . go (), new Particular . Properties (). group ( ModItemGroup . TUTORIAL_GROUP ))); } Finally, like with items add the register phone call to your chief class.
ModBlocks . register ( eventBus ); Registering the Custom Cake [ ]
The post-obit code shows how to add together a simple cake.
public static terminal RegistryObject < Block > EXAMPLE_BLOCK = registerBlock ( "example_block" , () -> new Block ( AbstractBlock . Properties . create ( Fabric . ROCK ). harvestLevel ( two ). harvestTool ( ToolType . PICKAXE ). setRequiresTool (). hardnessAndResistance ( 5f ))); Blockstates JSON [ ]
resources/assests/examplemod/blockstates/example_block.JSON
{ "variants" : { "" : { "model" : "examplemod:block/example_block" } } } Language File [ ]
resource\assets\examplemod\lang\en_us.json (<- en_us.json is the linguistic communication)
"cake.examplemod.example_block" : "Case Cake" , Block Model JSON [ ]
resources\avails\examplemod\models\block\example_block.json
{ "parent" : "cake/cube_all" , "textures" : { "all" : "examplemod:block/example_block" } } Associated Particular Model JSON [ ]
resources\assets\examplemod\models\item\example_block.json
{ "parent" : "examplemod:block/example_block" } Texture [ ]
resources\assets\examplemod\textures\block\example_block.png
Put your texture image here.
Creating a Custom Tool [ ]
Let's brand a simple spear, with damage ability similar to a rock sword.
Then, to start off with nosotros need to make a new directory called tools in your package. Next create a new Java enum chosen ModItemTier. In this file you need to type a variant of the post-obit:
package com.example.examplemod ; import mcp.MethodsReturnNonnullByDefault ; import net.minecraft.detail.IItemTier ; import net.minecraft.item.Items ; import net.minecraft.item.crafting.Ingredient ; import java.util.function.Supplier ; @MethodsReturnNonnullByDefault public enum ModItemTier implements IItemTier { CUSTOMNAMEHERE ( 1 , 131 , four.0F , 3.0F , five , () -> Ingredient . fromItems ( Items . Flint )); private final Supplier < Ingredient > repairmaterial ; private terminal int enchantability ; private final bladder attackDamage ; private final float efficiency ; private final int maxUses ; private last int harvestLevel ; ModItemTier ( int harvestLevel , int maxUses , float efficiency , float attackDamage , int enchantability , Supplier < Ingredient > repairmaterial ) { this . harvestLevel = harvestLevel ; this . maxUses = maxUses ; this . efficiency = efficiency ; this . attackDamage = attackDamage ; this . enchantability = enchantability ; this . repairmaterial = repairmaterial ; } @Override public int getMaxUses () { return this . maxUses ; } @Override public bladder getEfficiency () { return this . efficiency ; } @Override public bladder getAttackDamage () { return this . attackDamage ; } @Override public int getHarvestLevel () { return this . harvestLevel ; } @Override public int getEnchantability () { render this . enchantability ; } @Override public Ingredient getRepairMaterial () { render this . repairmaterial . become (); } } Next, you need to register your item. Get to your item registry class[?] and make a new item similar the one here:
public static terminal RegistryObject < SwordItem > NAME_SPEAR = ITEMS . register ( "name_spear" , () -> new SwordItem ( ModItemTier . CUSTOMNAMEHERE , 5 , - 2.8f , ( new Item . Properties ()). tab ( ItemGroup . TAB_COMBAT ))); .
The numbers are the base attack damage [added to the impairment set in the ItemTier] and the speed modifier, the values chosen for the example are intermediate between a sword and an axe.
After this, you need to make a JSON file in src/main/resource/assets/examplemod/models/detail chosen what y'all fix earlier, like and so:
{ "parent" : "detail/handheld" , "textures" : { "layer0" : "examplemod:item/name_spear" } } Then, become to your textures folder and input the texture y'all will make in the adjacent step. If you desire to know more well-nigh immovability I recommend this folio.
Custom Layers over Vanilla Textures [ ]
![]()
This section is a work in progress.
Please help in the expansion or cosmos of this article past expanding or improving it. The talk folio may comprise suggestions.
Textures from Scratch [ ]
Open up an epitome editor, preferably one that supports transparency, and create a new image, with a size that is a multiple of 16x16 (eg. 32x32, 64x64. etc.)
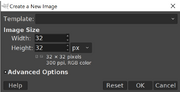
Creating a 32x32 pixel canvass in GIMP
This example is using a 32x32 pixel image and is made in GIMP.
Create your file, making sure it is in pixels and not inches, millimetres, or whatever other measurement.
Create a new layer, and delete the original canvas. If you don't do that, then your image will have a white background.
Using a brush of 1x1 pixel, start drawing your detail. Brand sure to apply dissever layers for separate parts of the item to allow changes to be made easier.
When y'all're done creating your fine art, press file to salvage. If you're using GIMP or some other advanced editor, it won't salvage equally a .png. For GIMP, it saves equally a .xcf.
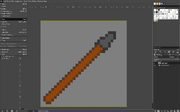
With the spear done, press file so save. Note the lack of white in the background, and instead the bare .png background.
Navigate to the export dropdown or press ctrl+east on Windows or ⌘+E for macOS. This is to consign the file. Make sure you export as a .png, non a .jpg or any other file extension. If it is not saved every bit a .png, it will have a white background and won't look correct.
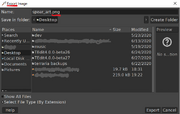
Exporting the art of the rock spear to desktop. Note that it is existence exported equally a .png. Certain parts censored for privacy.
If y'all're following along with this tutorial and wish to use this prototype, you tin can download this finished pixel fine art here.
Creating a Custom Mob [ ]
Models from Scratch [ ]
The all-time way to model mobs is probably blockbench (blockbench website). Blockbench is a gratuitous modeling tool, and it would be much faster and easier than taking the other approach, which is slow. If you want to model with information technology, just make a cube, position it, rotate information technology, size information technology, and make your model the way you want to brand it. If you need more cubes, y'all tin hands brand a new one. This is probably the all-time method for this. Information technology is fast, piece of cake, and customizable.
Creating a Config file [ ]
![]()
This department is a work in progress.
Please help in the expansion or creation of this article by expanding or improving information technology. The talk folio may contain suggestions.
Sharing Your Mod [ ]
![]()
This section is a work in progress.
Please aid in the expansion or creation of this commodity by expanding or improving information technology. The talk page may contain suggestions.
To build your mod, run gradlew build or ./gradlew build for macOS. This will output a file in build/libs with the proper name [archivesBaseName]-[version].jar. This file can be placed in the mods binder of a forge enabled Minecraft setup, and distributed. So you can upload your mod to CurseForge
Further Reading [ ]
![]()
This section is a work in progress.
Please help in the expansion or creation of this article by expanding or improving it. The talk page may contain suggestions.
https://mcforge.readthedocs.io/en/latest/gettingstarted/
Additional Info [ ]
![]()
This section is a work in progress.
Delight help in the expansion or creation of this article by expanding or improving it. The talk page may contain suggestions.
Recommended:
- create a GitHub account to manage versions of your mod and collaborate with other developers.
- further tutorials (in video course, for version 1.15.2)
- text tutorials for 1.sixteen.v, 1.17.1, and one.18.2
See besides [ ]
- Tutorials/Loading a resource pack
- Tutorials/Creating a resource pack
- Tutorials/Installing a data pack
- Tutorials/Creating a data pack

How To Build A Forge In Minecraft,
Source: https://minecraft.fandom.com/wiki/Tutorials/Creating_Forge_mods
Posted by: mcmasterswhins1943.blogspot.com
0 Response to "How To Build A Forge In Minecraft"
Post a Comment